WFH OBS Video Conferencing Setup
Another one of my setups that is requested sometimes is my WFH video conferencing setup. This is usually due to my use of OBS/scenes and/or the video and audio quality that I can pull off. Rest assured that it isn’t a fancy Youtuber/Twitch streamer setup - I simply don’t do enough video conferencing to warrant such a setup even though I’ve been doing WFH before COVID-19.
My setup is pretty basic, but it’s my preferred way of running things. The following is just a quick list of the hardware and software for those who like people listing down all their gear.
Why OBS
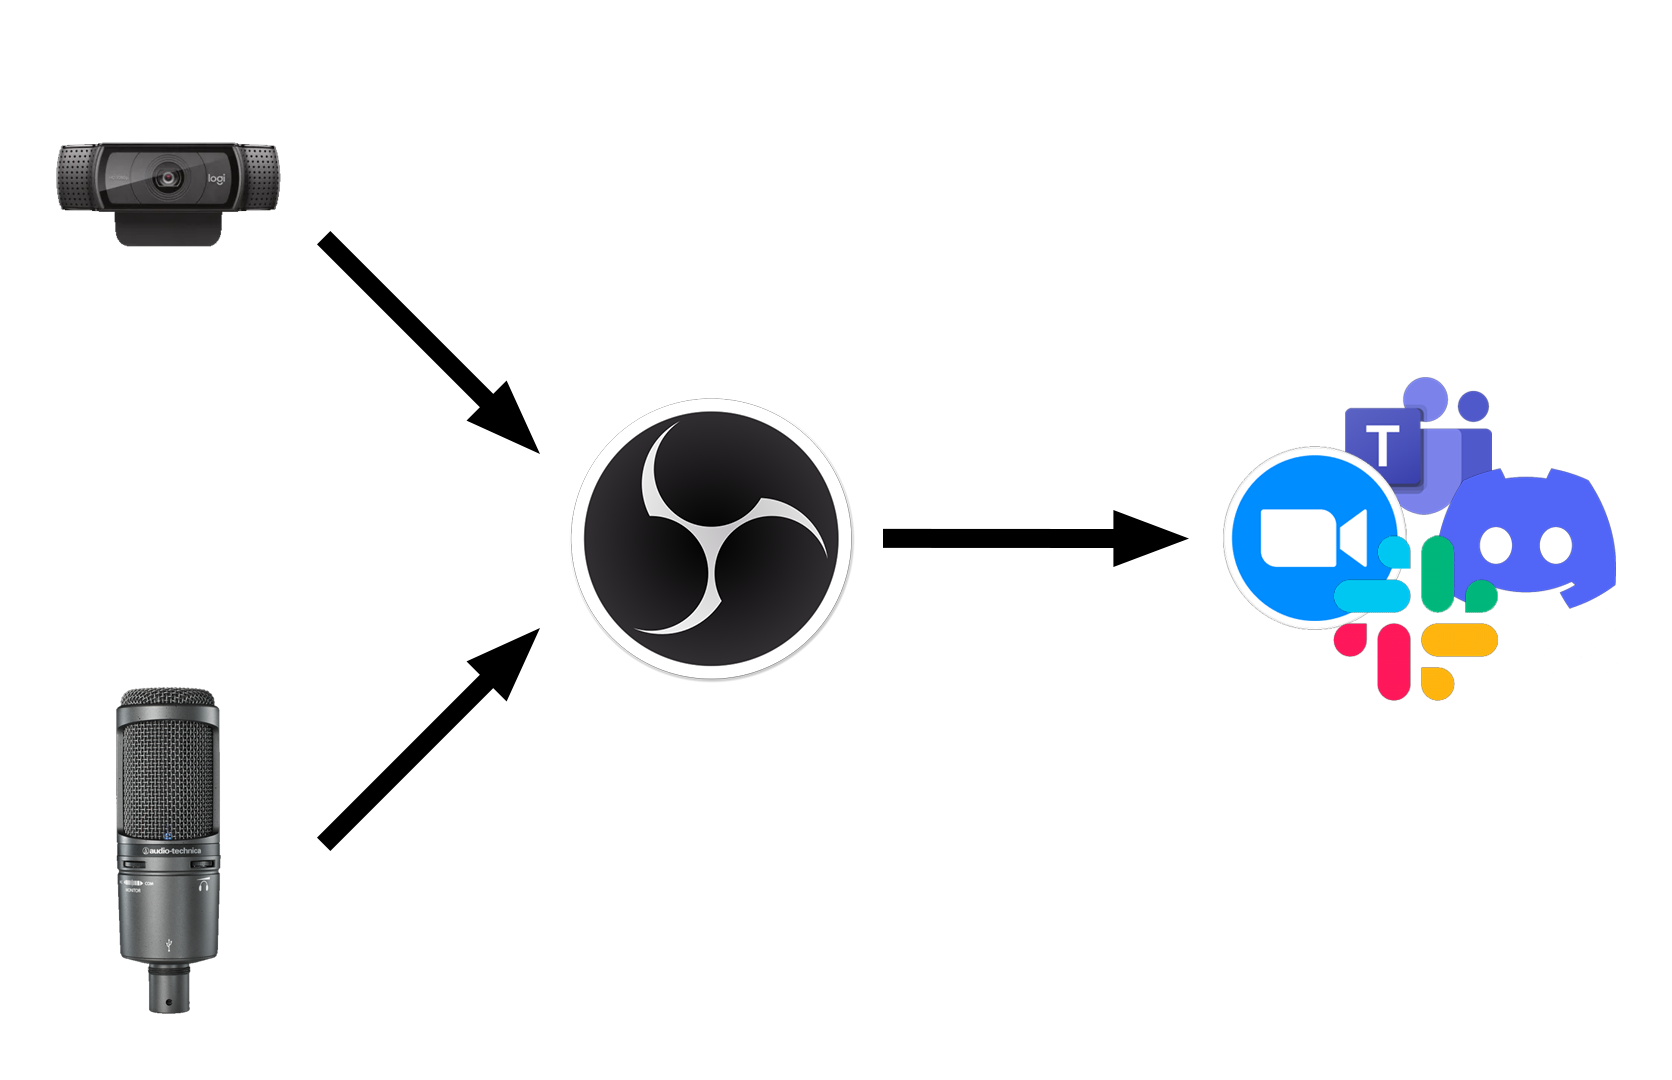
I really like piping both my video and audio through OBS and then using it as a video/audio source (via the virtual webcam plugin) for whatever video conferencing software I have to use.
In quick points, these are the reasons why:
- It is a single point of control for my video conferencing setup whilst I am using it. i.e. I’m not searching for the right options in whatever video conferencing setup I am using.
- My settings persist between different video conferencing software i.e. If I set my audio mix/scene in a certain way it’ll be the same across whatever video conferencing software I am using.
- Customisable scenes -scenes are pretty much preset configurations you can switch between. Some examples/reasons why they’re handy:
- I don’t have to either share my screen or show my face. I can do a completely custom setup and position/overlay myself or other sources/overlays over my desktop capture (censor out sections for example). The customisation is limitless.
- My setup can be switched quickly - a video tutorial/training session will be setup differently to a meeting. With OBS I can configure the scene and save it and quickly switch between whatever I need at that time.
- Controlling what I share without having to constantly find the program in a list/dropdown - I can quickly switch to using scene setups on OBS. I usually just setup a monitor to be the designated “shared screen” - this makes it mentally easier to track what is being shown on the other end.
- Nicer transitions - fade transitions (or fancy star wipes) and having intermission scenes are much more professional looking than abrupt cuts you get when transitioning from webcam to monitor.
- No unintentional webcam streaming - the device selected by the video conferencing software would be “Virtual OBS Camera” or something to that effect. Therefore, if OBS is off, then there’s no webcam shot at all. You can take this a step further by setting up a default blank scene (or a connecting/intermission scene) so you have to make the deliberate effort of switching scenes.
- You can control it via third party apps or hardware like control pads like the Stream Deck or repurposed num pad with macros/key re-mappers.
- I can monitor my audio - this is big as I can easily see if my microphone is working and whether my audio is peaking or not. I can also selectively choose and mix desktop audio - also handy sometimes!
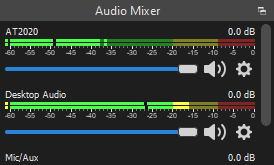
OBS Audio Mixer - note gain control and disabling desktop audio.
You don’t necessary have to use the “virtual camera” as the source for audio. As it can be quite annoying to open OBS if you need to pipe audio. You can still have it as a source in OBS to just monitor your levels, but your changes won’t affect what’s being broadcasted.
Details
Hardware
Audio Technica AT2020 USB Microphone
For a while I was tossing up whether to get an XLR dynamic microphone and pair it up with an audio interface (and also pick up an instrument to learn - COVID lockdown times ;-) ). However, after picking this microphone on a Black Friday deal, I think it would have a been a bit overkill for my needs and just added more to my desk clutter. The USB interface is nice and lets me use it in slightly more mobile setup if I want to move it from my battlestation setup to a battletop setup at another location. I don’t need to play around with an additional interface and it’s been pretty much plug and play since I started using it. The condenser design hasn’t been a detriment to me as I don’t really type much whilst in calls (usually mute myself) and the noise cancellation in Discord is pretty good and it doesn’t pick up my mechanical keyboard much.
I have the microphone mounted on a cheap desktop microphone mount stand I got off eBay for about $20 and it’s worked perfectly fine. It doesn’t pickup on any vibration from my desk and I haven’t found that I needed any further isolation/suspension systems or a pop filter. Only wish it had a manual gain knob. The microphone is placed around chest height between my body and keyboard and is out of frame.
Other microphones I was considering that have good reviews would have been the Rode NT-USB Mini and the Shure MV7.
Logitech C920 Webcam
Got provided one of these in my swag/welcome bag in a recent job. No complaints from me on it as I keep a pretty well lit work area (doubles as my workbench) so I don’t run into quality issues. Bad lighting is what is probably restricting your web camera if you’re not happy with the quality coming from it.
For what it’s worth, I have my monitors in a portrait/landscape/landscape (PLL) setup and position the camera on slightly taller portrait monitor just above my eyeline. I would like to look like I’m facing the camera naturally, so having the camera slightly higher and the video app on the top half of my portrait monitor gives me that look.
HD6XX Headphones
If I’m working at home, I much prefer using open back headphones. They’re more comfortable to have on for longer hours and I can hear any ambient sounds (door knocks/deliveries) and I can also hear my own voice much better as to not talk to loudly on calls.
I go to Airpods/IEMs when I want something a bit more discreet.
O2/ODAC
What I use to drive the HD6XX and other headphones - I’ve had this for almost a decade and was a kit build. No need for a stack to add more clutter. This does the job for me. My hearing isn’t that good for anything more fancy.
Additional Monitors
I don’t think I could pull off this setup without at least an additional monitor. Not only does it give me extra real estate to work, the additional lighting from the monitors certainly helps! I have a triple monitor setup (PLL) so it doesn’t real throw off the balance and aids in the overall lighting of my scene.
Software
- OBS
- Virtual Cam - Used to create “virtual” webcams so the video conferencing software will recognise the OBS output. There is now native support now, but I have yet to test it as this setup was done before the native implementation.
- Background Removal - Used to provide the same (but not as good) background removal as seen in Zoom/Teams etc.
- Chroma Key Filter - default filter packaged with OBS.
OBS Configuration
This configuration covers my base configuration for OBS. It’s pretty much the setup I use most of time. It has my two main sources (webcam and microphone) and includes a monitor capture source as well as a background to use when I want to enable the background removal filter.
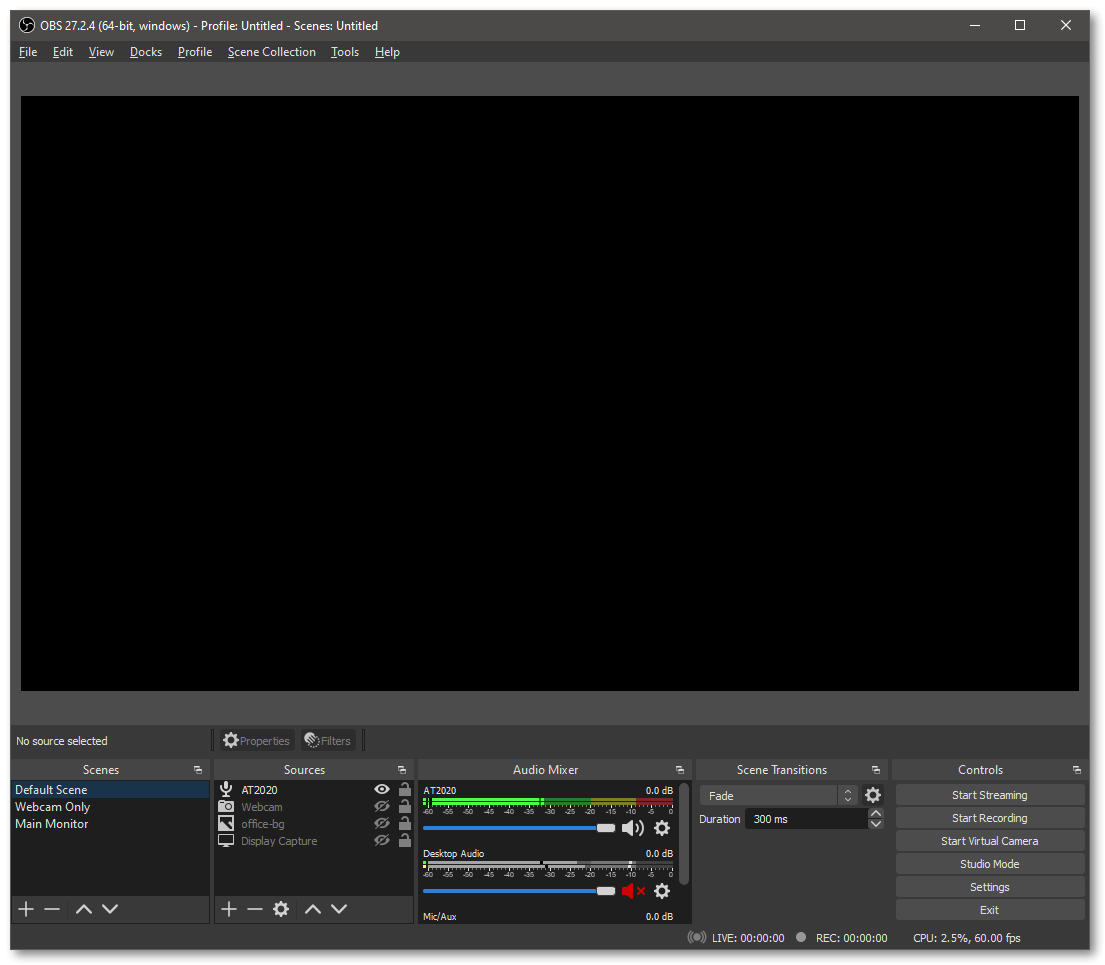
Overivew of my most basic OBS configuration.
Background Removal Filter
I use a background removal plugin to emulate the background removal/blur you get in most modern video conferencing applications (like Teams/Zoom). This is just an open source implementation of it and doesn’t match the quality of the others, but it’s good enough for me (especially if you have a decently contrasting background and a well lit setup). The following in a screenshot of the settings that I use. You can access this by right clicking the video source and selecting filters - in this case it’s my webcam source.
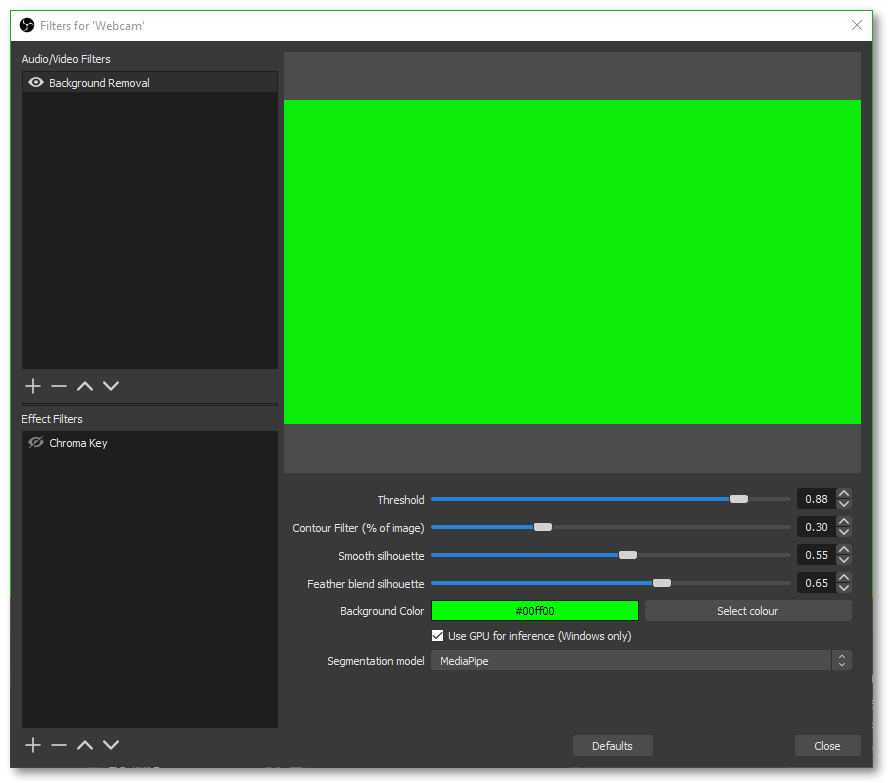
Background removal settings.
As you can see, the background removal also provides a matte background (green representing the background removed) for a chroma key filter to help mask in your background.
Chromakey Filter
After background removal, we need to remove the background colour generated by the background removal filter. Using the built-in chroma key filter will remove the background colour and I’ve provided my settings in the screenshot below.
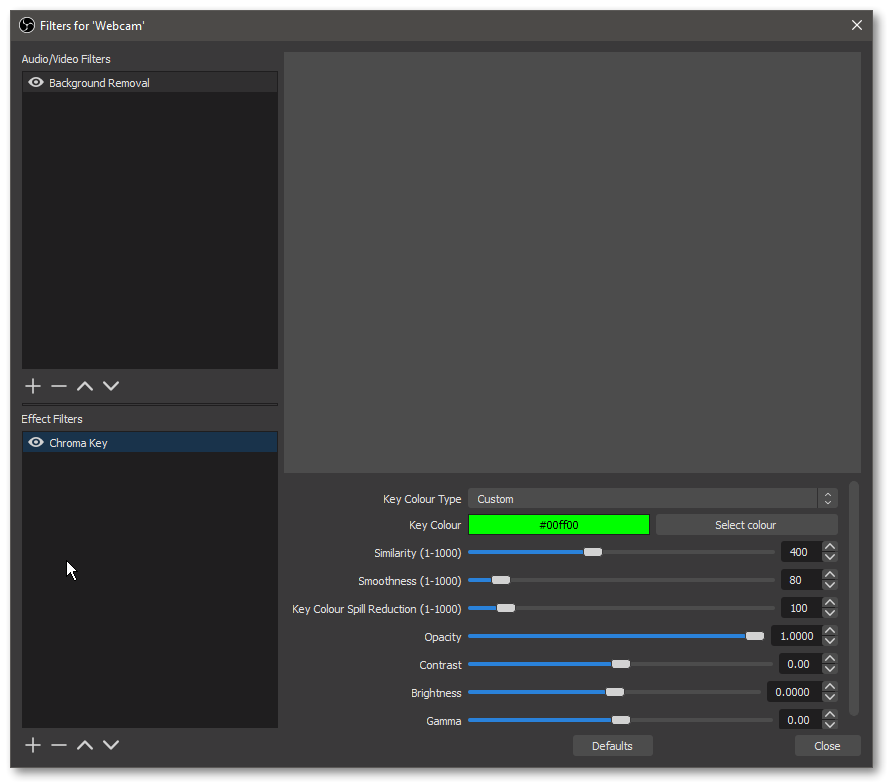
Chroma key settings.
After the chroma key filter is applied, you should end up with the desired background removal effect. You will then need to add another source (an image) and make sure it sits lower than the filtered webcam source.
Virtual Camera
Once setup, you can then activate the virtual camera by selecting the “Start Virtual Camera” button under the “Controls” tab. I haven’t tested the native virtual camera implementation yet and I’m still using the plugin, which is still running fine on the latest version of OBS at the time of writing this. The setup is pretty simple on the plugin and the following screenshot shows my configuration of it.
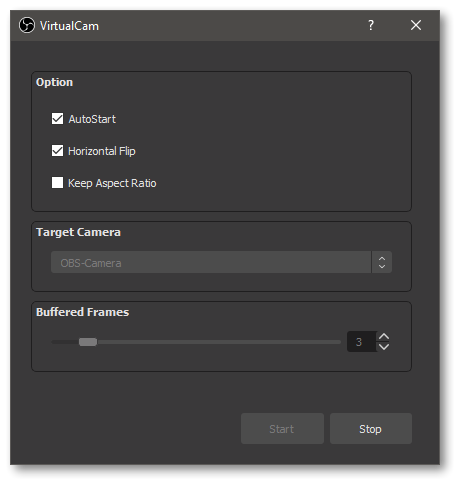
VirtualCam plugin settings
That pretty much covers my basic OBS setup.
Getting Quality Video and Audio
You can achieve good quality video without pretty basic hardware that you might have already. I think what makes the biggest difference in video quality is the lighting. For audio, a good mic definitely helps here, but again you don’t really need to spend much to get good audio quality. I would also invest in a good microphone before a camera setup as you’ll probably end up using the microphone a bit more than the webcam.
I’ve included some YouTube links to some helpful videos on getting both audio and video squared away.