ShareX
ShareX - my preferred screenshot tool for Windows.
I’m OS agnostic, but one of the programs I wish I had on all the computers I use would be ShareX. Years ago, ShareX originally for me was a more powerful replacement to the stock snipping tool on Windows, and something that I could get close to the built in screen capture tools on macOS through hotkeys. It has since surpassed being just my screenshot program, as it does so much more!
Reasons why it’s better than anything else on Windows in my opinion:
- It’s free and open source!
- Customisable hotkeys/shortcuts.
- Configurable tasks for after capture/upload that help with improving workflows.
- You can export and import your configuration easily.
- Powerful screenshot annotation tools.
- Tonnes of extra tools built in that are handy.
- Screen recording (video or gifs)
- OCR
- Video converter (ffmpeg)
- Hash checker
- Lots of file uploader support
- It’s pretty lightweight overall for all the things it does.
Below are the details of my basic setup that I recommend and share to my colleagues and friends. It’s then up to them to add more to it to fit their workflow.
Hotkeys
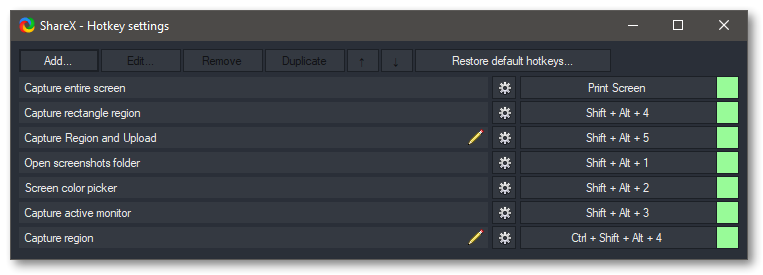
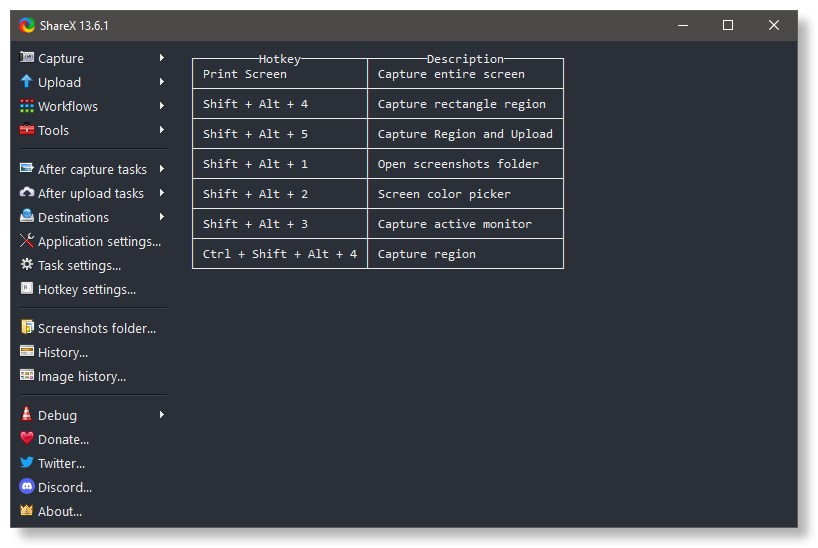
Basic hotkeys I setup.
The most natural hotkeys for me to use for taking a screenshot is the macOS hotkeys. e.g. CMD + Shift + 3, CMD + Shift + 4 etc.
Therefore, I emulated the macOS keys by substituting the ‘Alt’ key for CMD. Pretty natural now - especially on desktop as I use to be fine with switching between operating systems as my Linux distros/OS X experience was entirely on a laptop. I’ve also copied the “capture, but not save as an image” hotkey as that’s handy for quickly taking a screenshot and sharing (as the screenshot gets added to your clipboard).
The two other hotkeys I add to my basic setup that I share and recommend is the screen colour picker and a shortcut to open up the saved screenshots folder.
Image Editing/After Capture Tasks

Drop shadow to mimic the macOS screenshot style.
Drop Shadow
I emulate the macOS screenshot drop shadow using ShareX’s shadow tool in the image effects configurator. You can turn this off easily when not required by toggling the image effects in the ‘after capture tasks’ options.
The following option gets it close to the macOS drop shadow to my eyes (and it’s what’s being used for the screenshots on this post).
Opacity: 0.5
Size: 10
Darkness: 0
Color: #000000
Offset: 5,5
Resizing
I also setup a couple other image effects such as resizing images to certain widths. This is handy for when I’m writing up documentation and limiting the size of the files I’m adding.
Other Functions
Screen Recording
I also use ShareX as my screen capture tool. Handy for when you need to record your screen/calls/training etc. I’ve included my settings below (I think it’s mostly stock - but I can’t tell as I first set this up years ago)
-rtbufsize 150M -f dshow -framerate 30 -i video="screen-capture-recorder":audio="virtual-audio-capturer" -c:v libx264 -r 30 -preset ultrafast -tune zerolatency -crf 30 -pix_fmt yuv420p -movflags +faststart -c:a aac -ac 2 -b:a 128k -y "output.mp4"
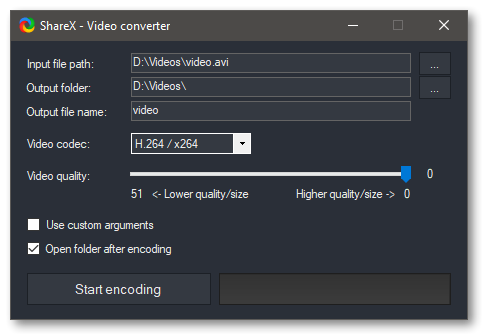
Video Converter
Drop shadow to mimic the macOS screenshot style.
I’m mostly familiar with using ffmpeg on the command line to convert videos, but ShareX again provides a simple UI handy for those that aren’t! It’s laid out pretty simple where you specify the video you want to convert, the output location and name, and finally the format that you want to convert it to. Most of my non-tech savvy friends can use it just fine. Perfect!
Alternatives?
With more recent Windows version, there’s now a dedicated shortcut which might work for most people (Windows + Shift + S). There’s also other programs like Greenshot (FOSS) and SnagIt (paid), but I lean towards ShareX because:
- ShareX is FOSS with more consistent stable releases.
- Additional productivity tools provided as previously mentioned.
I can see why some folks prefer Greenshot over ShareX for it’s simplicty, but for more tech savvy/power users, ShareX would be the ideal program.
Final Thoughts
I would recommend that you don’t use the uploading function for screenshots if you don’t plan on sharing your images through an image host (which could mean your uploads are available publicly!). I wish ShareX had a global flag to stop all upload traffic/block file uploads - it could just be hidden somewhere in the settings. I personally set the file uploads to go via Dropbox, requiring a more conscious effort to upload it to my more public host like imgur for when I do wish to share screenshots to the public i.e. posting on reddit.
The menus for the settings can be a bit confusing when you first start using it (setting menu for tasks, hotkey, applications etc.), but it isn’t too bad once you get use to it or just set and forget.
Nonetheless, ShareX is one of the first programs I put on a new Windows machine. There’s a reason why it’s on Ninite!